Demo #1 Setting Up Environment
Principles in our demos
- You should focus more on learning the core concepts and applications than setting up environment. Environment setup and cluster management are usually not the responsibility of new hires, especially in large companies with dedicated ops teams.
- Don't spend too much time on complex cluster configuration and environment setup as a beginner. This can detract you from learning the fundamentals. Focus more on the higher level abstractions and use cases.
- Leverage existing documentation and sample code. Don’t reinvent the wheel.
- Take an iterative approach to learning. Get the basics working first, and later dive into refinement, optimizations and customizations.
We have three options of setting up Kafka clusters (Official Confluent Platform reference). The first one with Confluent Cloud + Confluent CLI (python) will be used in our classroom. The Confluent Cloud path provides a fully managed service so you don't have to provision your own Kafka infrastructure. The local install and Docker approaches (Method #2 and #3) allow you to run Confluent Platform locally for development and testing.
-
Method #1: Managed Confluent Cloud + CLI
We have two options of python client:
confluent-kafka-pythonandkafka-python. In Demo #2, we will cover both of them. -
Method #2: Local Docker install (not covered in the course)
- Method #3: Local native install (not covered in the course)
Method #1: Confluent Cloud + Confluent CLI
Overview
Confluent Cloud is a managed Kafka service provided by Confluent, the company behind some of the popular Kafka toolsets. The significant advantage of using Confluent Cloud is that you don't have to worry about the infrastructure or configuration of a Kafka cluster. Everything is managed, and you can focus entirely on your application and client development. This method is used in the classroom.
Benefits
- Simplicity: No need to set up or maintain the Kafka cluster.
- Scalability: Managed services often offer easy ways to scale your usage as needed.
- Reliability: Managed by experts, ensuring high availability, backups, and other best practices.
Method #2: Local Cluster (self-managed)
Overview
This is about setting up a Kafka cluster on your local machine, often for development or testing purposes. There are resources available in the official documentation to guide through this setup. Although Method #2 is not our default setup for demos, I highly recommend self-study so you may find it useful in your course project with other services to be developed on local machine.
Docker with Confluent Platform
Docker provides a way to run applications securely isolated in a container, packaged with all its dependencies and libraries. The links you provided are guides on setting up the Confluent Platform (which includes Kafka and other tools) using Docker containers.
Note: The native Kafka installation is one option, though Docker provides isolation benefits.
Benefits of Docker-based Local Setup
- Isolation: Ensures Kafka doesn't interfere with other software on your machine.
- Reproducibility: A consistent setup across different machines.
- Ease of Setup & Cleanup: With a few commands, you can start and stop a Kafka cluster.
Instructions (Method #1)
Step 1.Confluent Cloud Account: Sign up and be aware of the $400 free credit. Link.
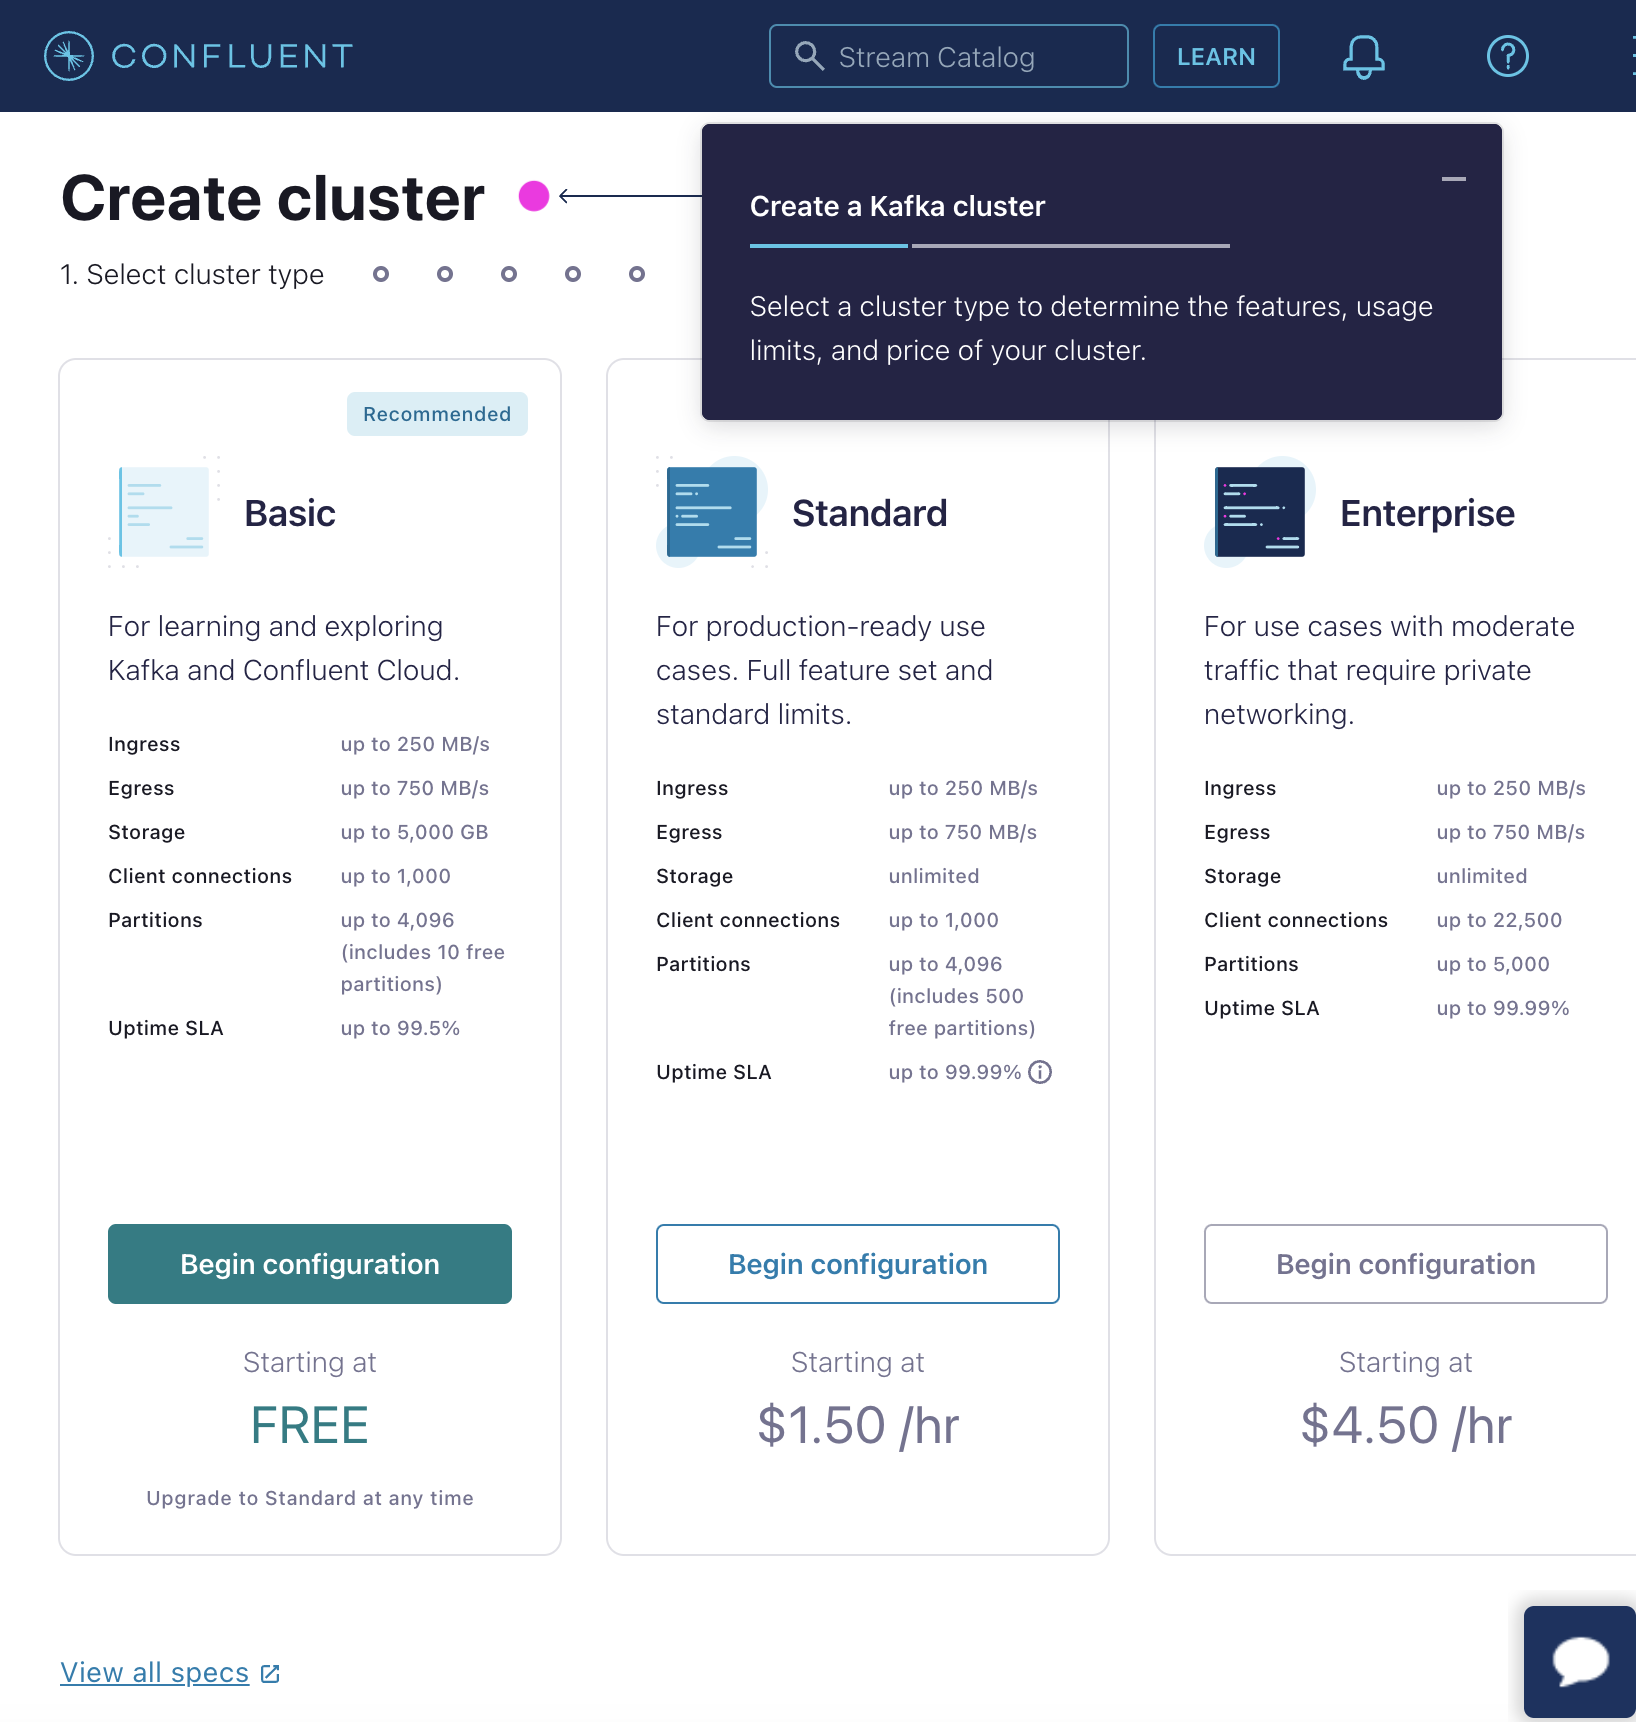
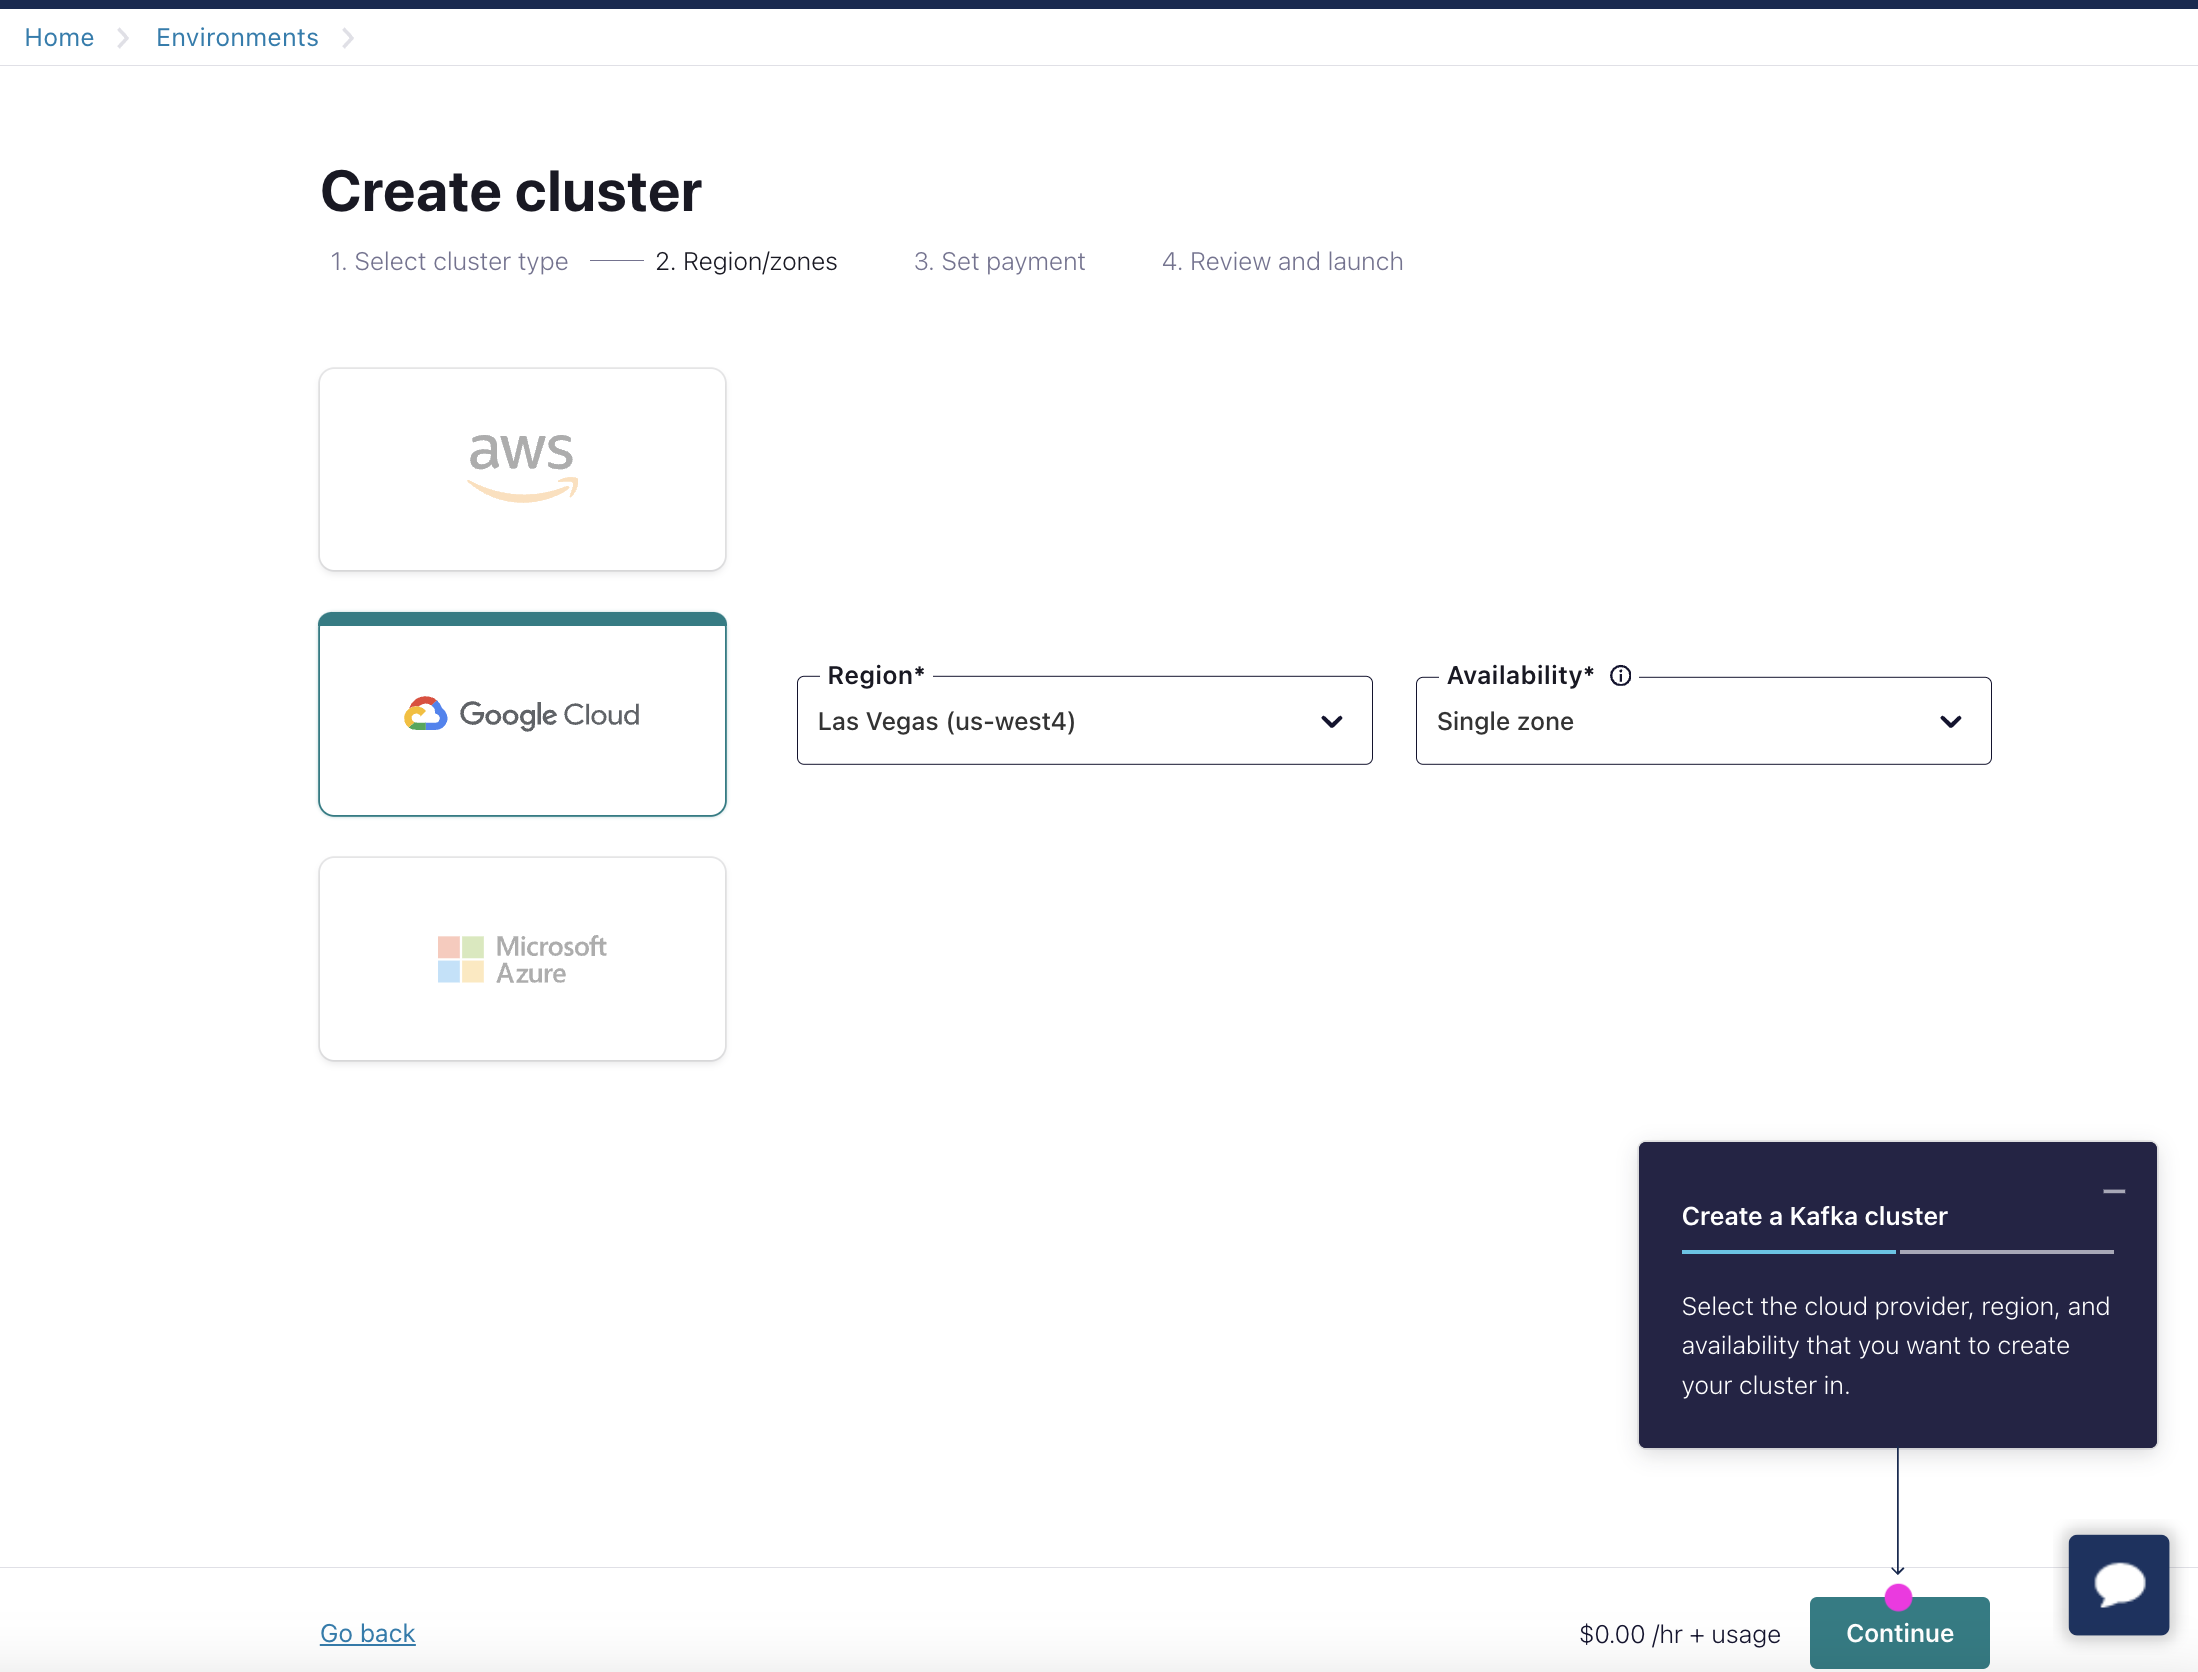
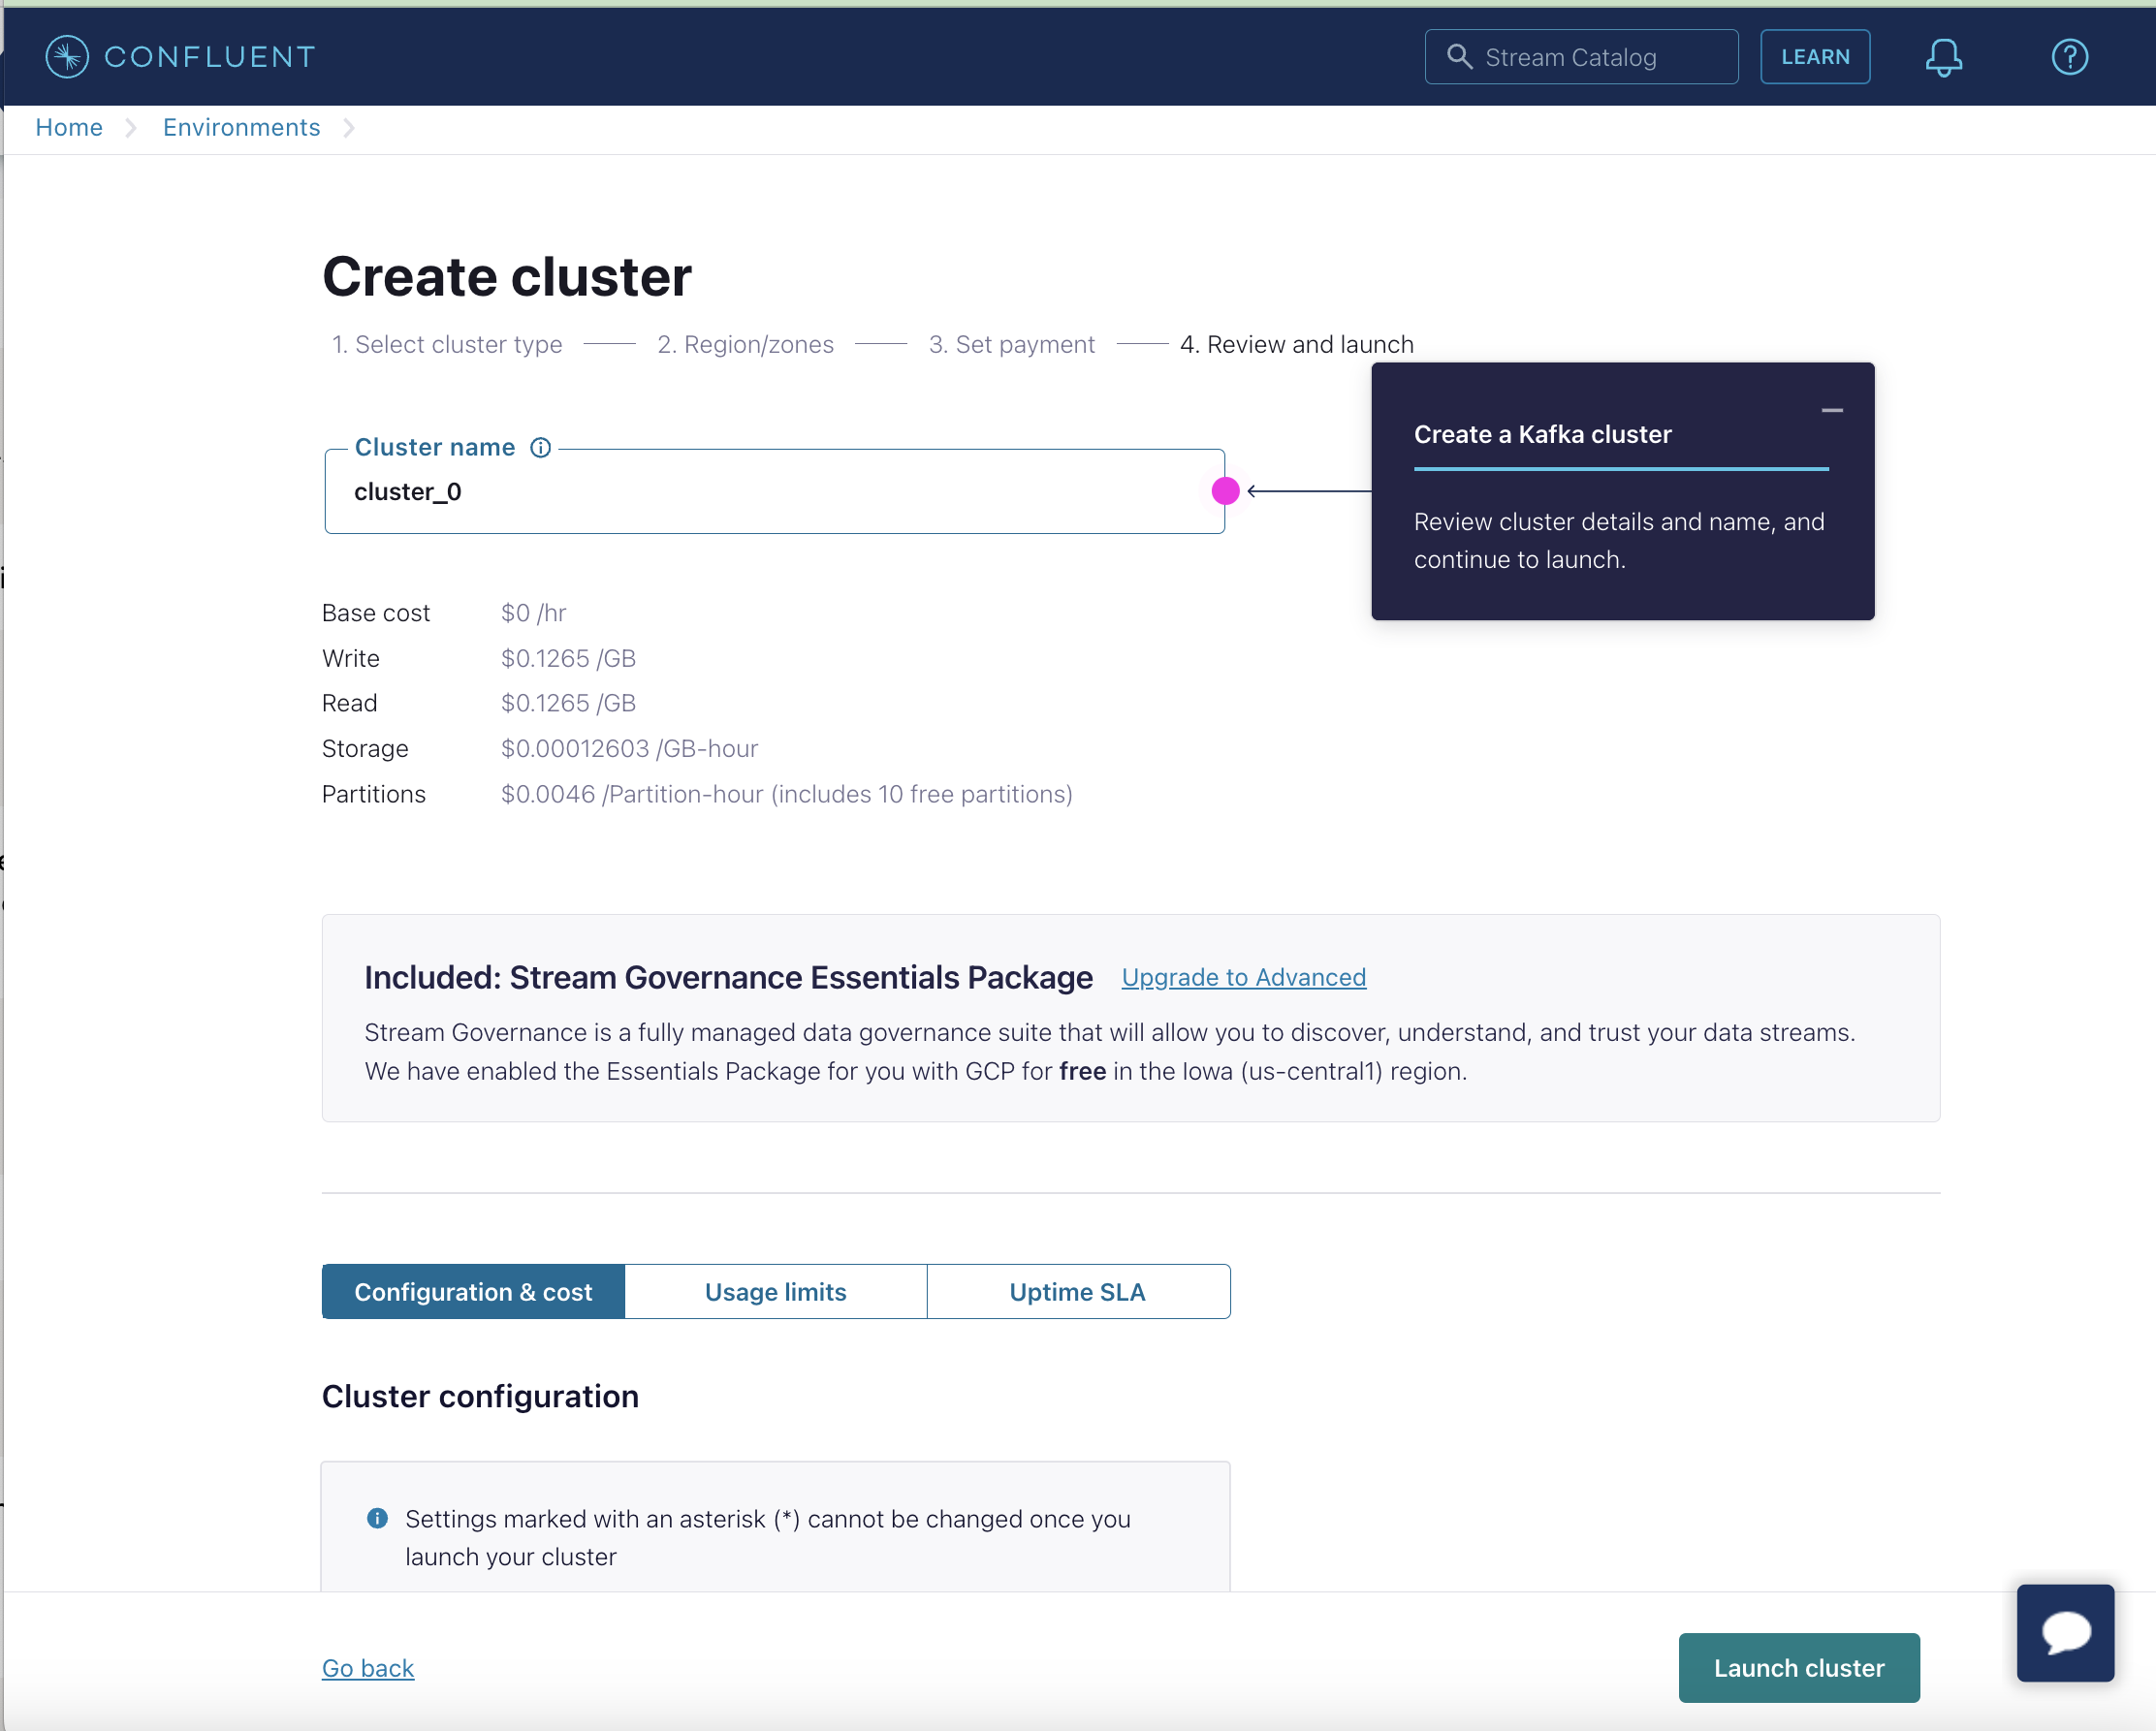
Step 2. Creating & Running Confluent Cluster: Set up a Kafka cluster on Confluent Cloud.
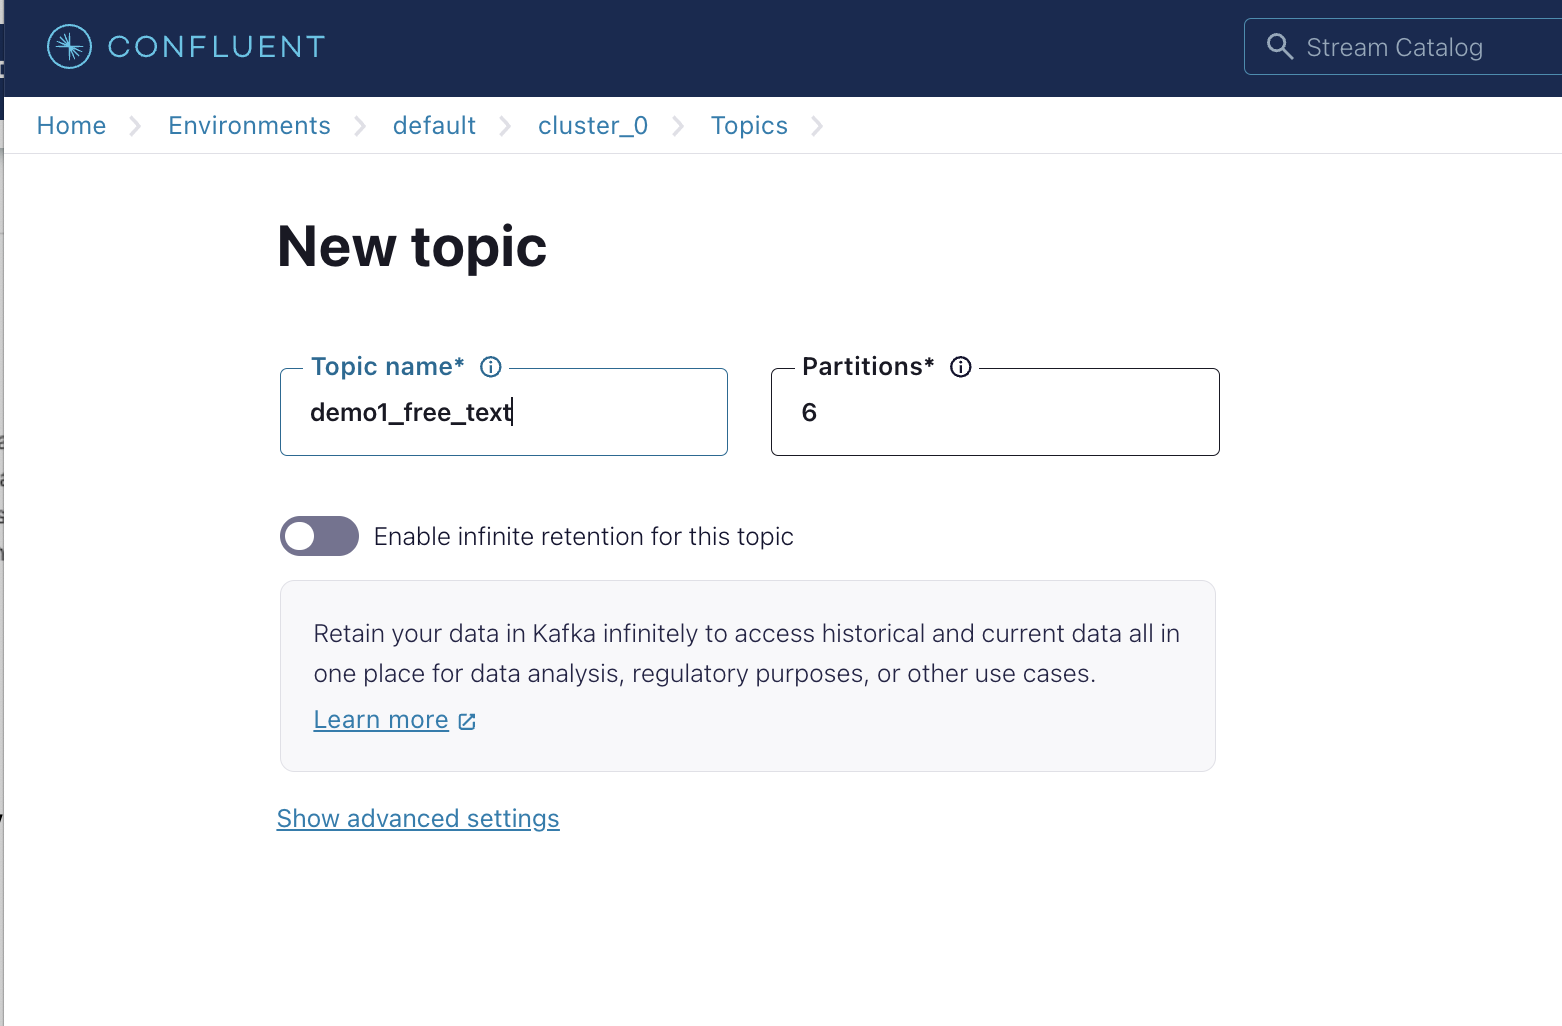
Create Cluster
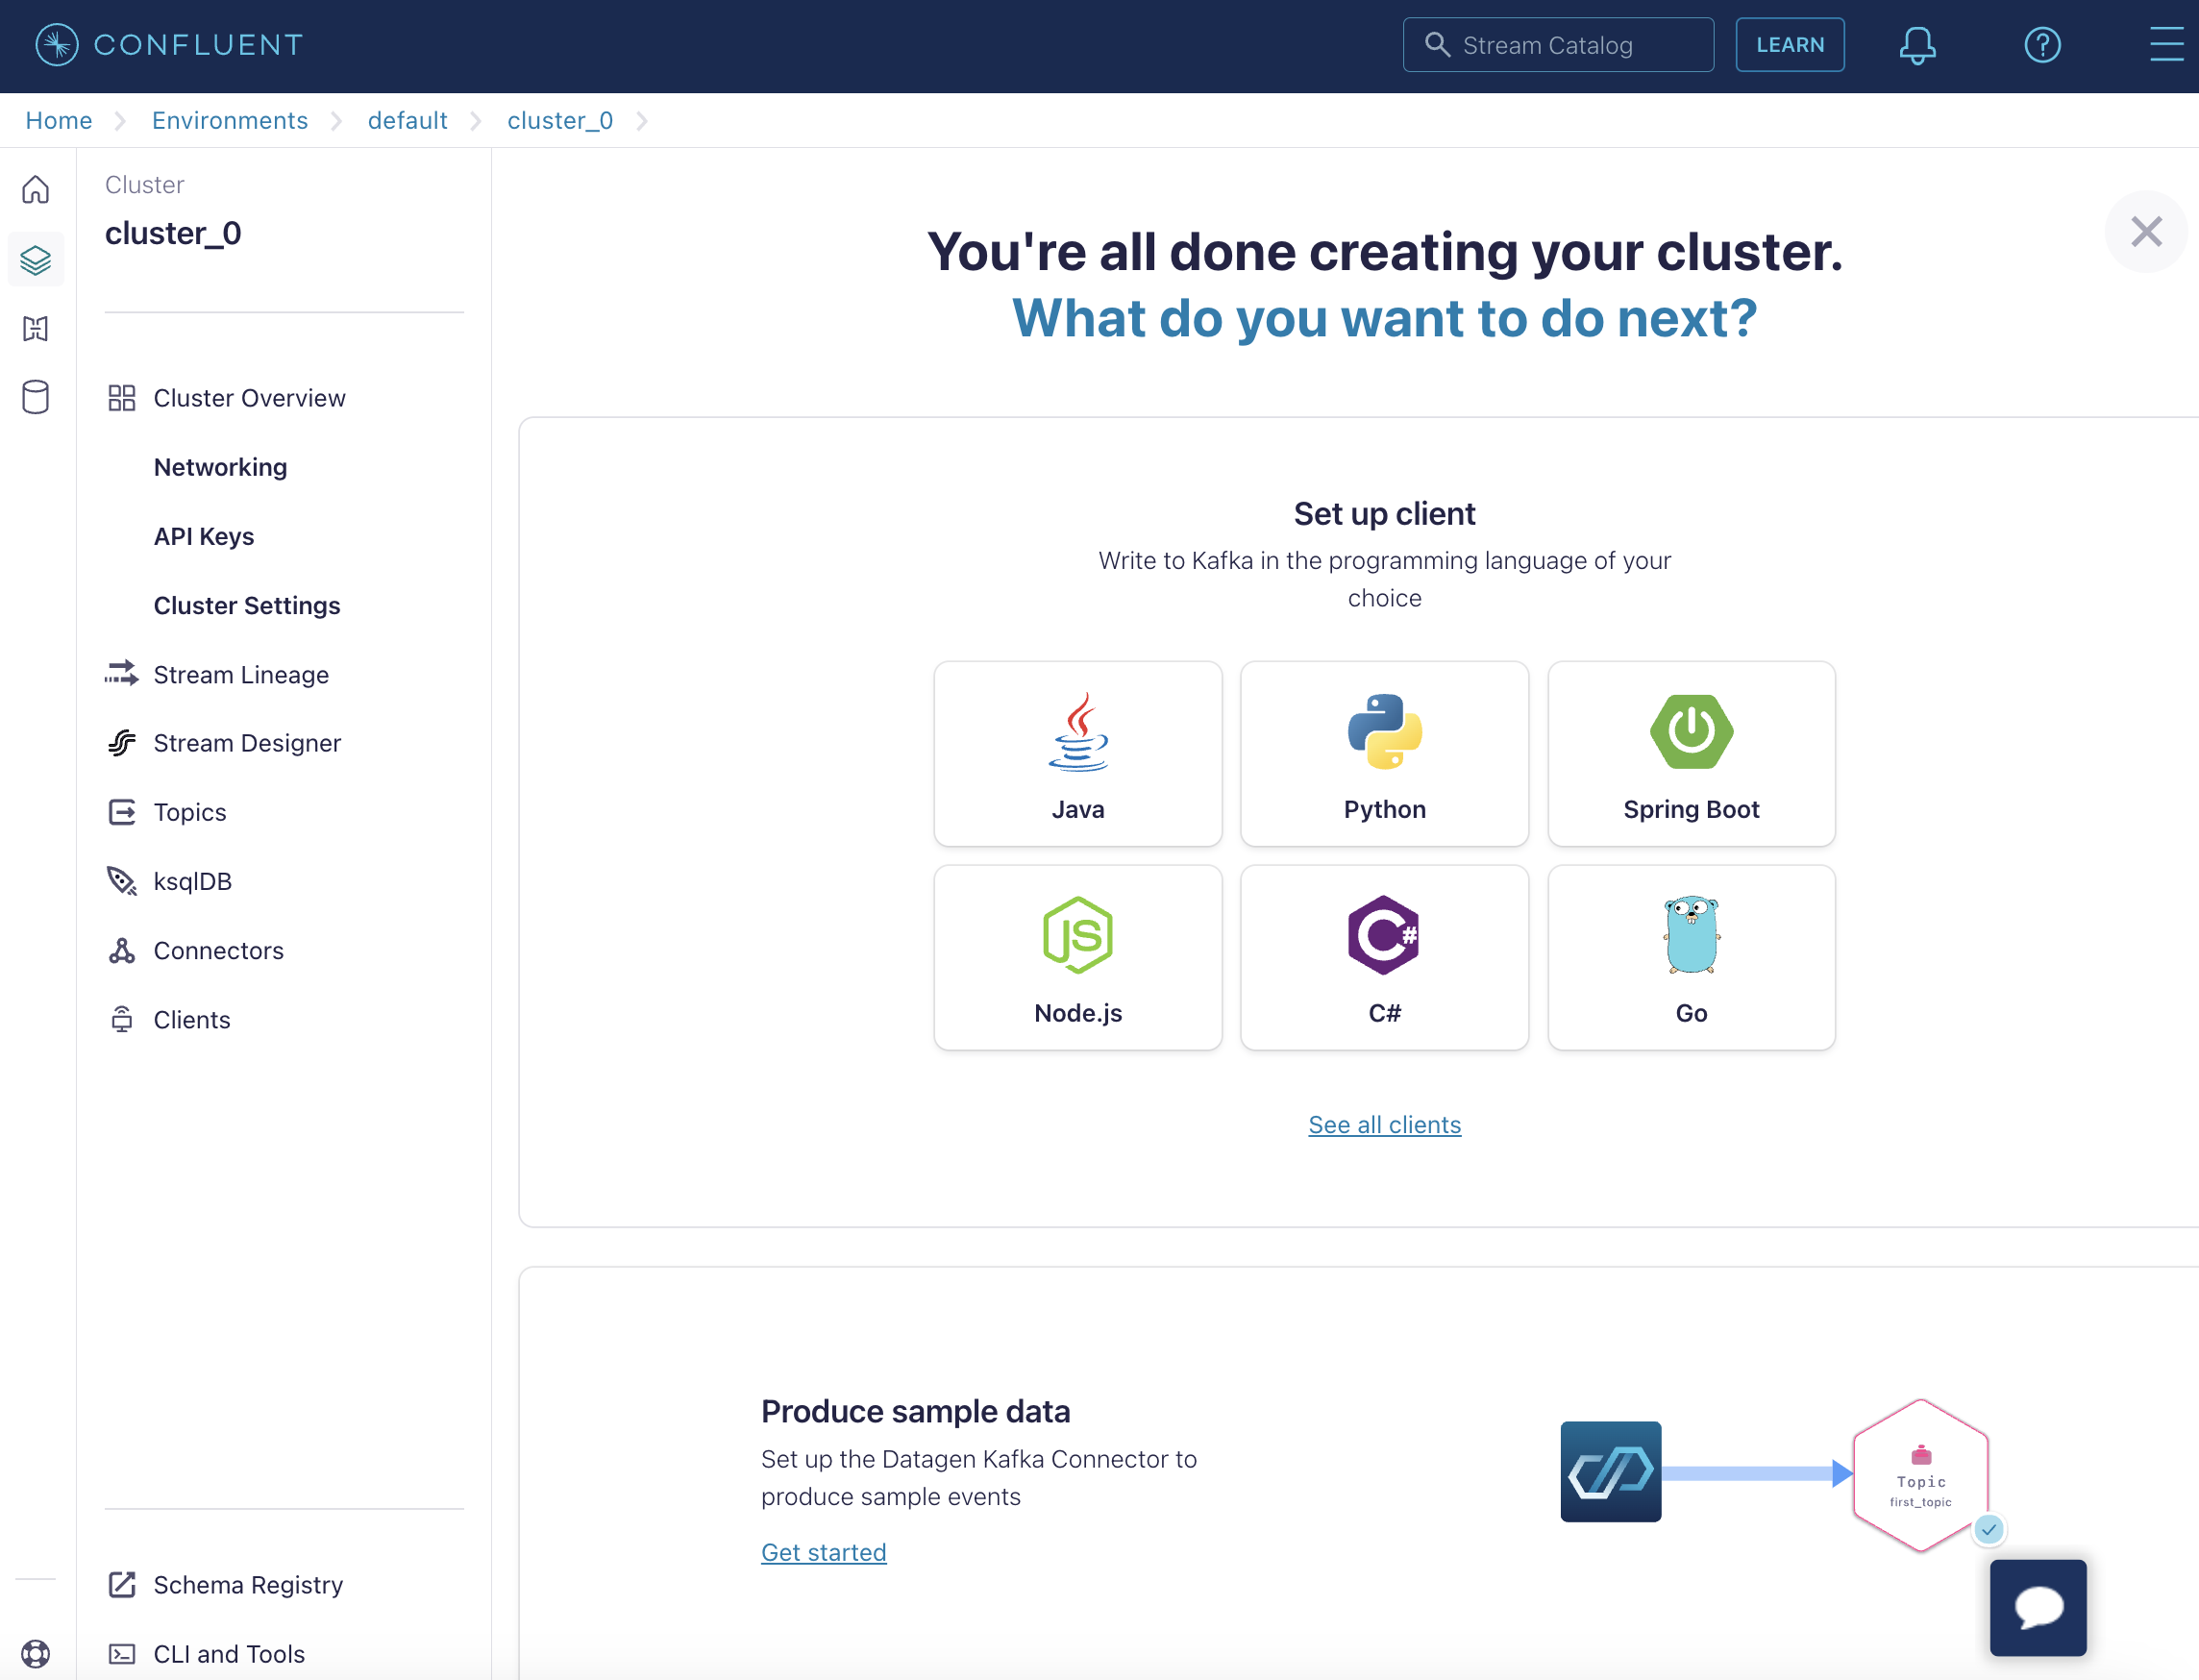
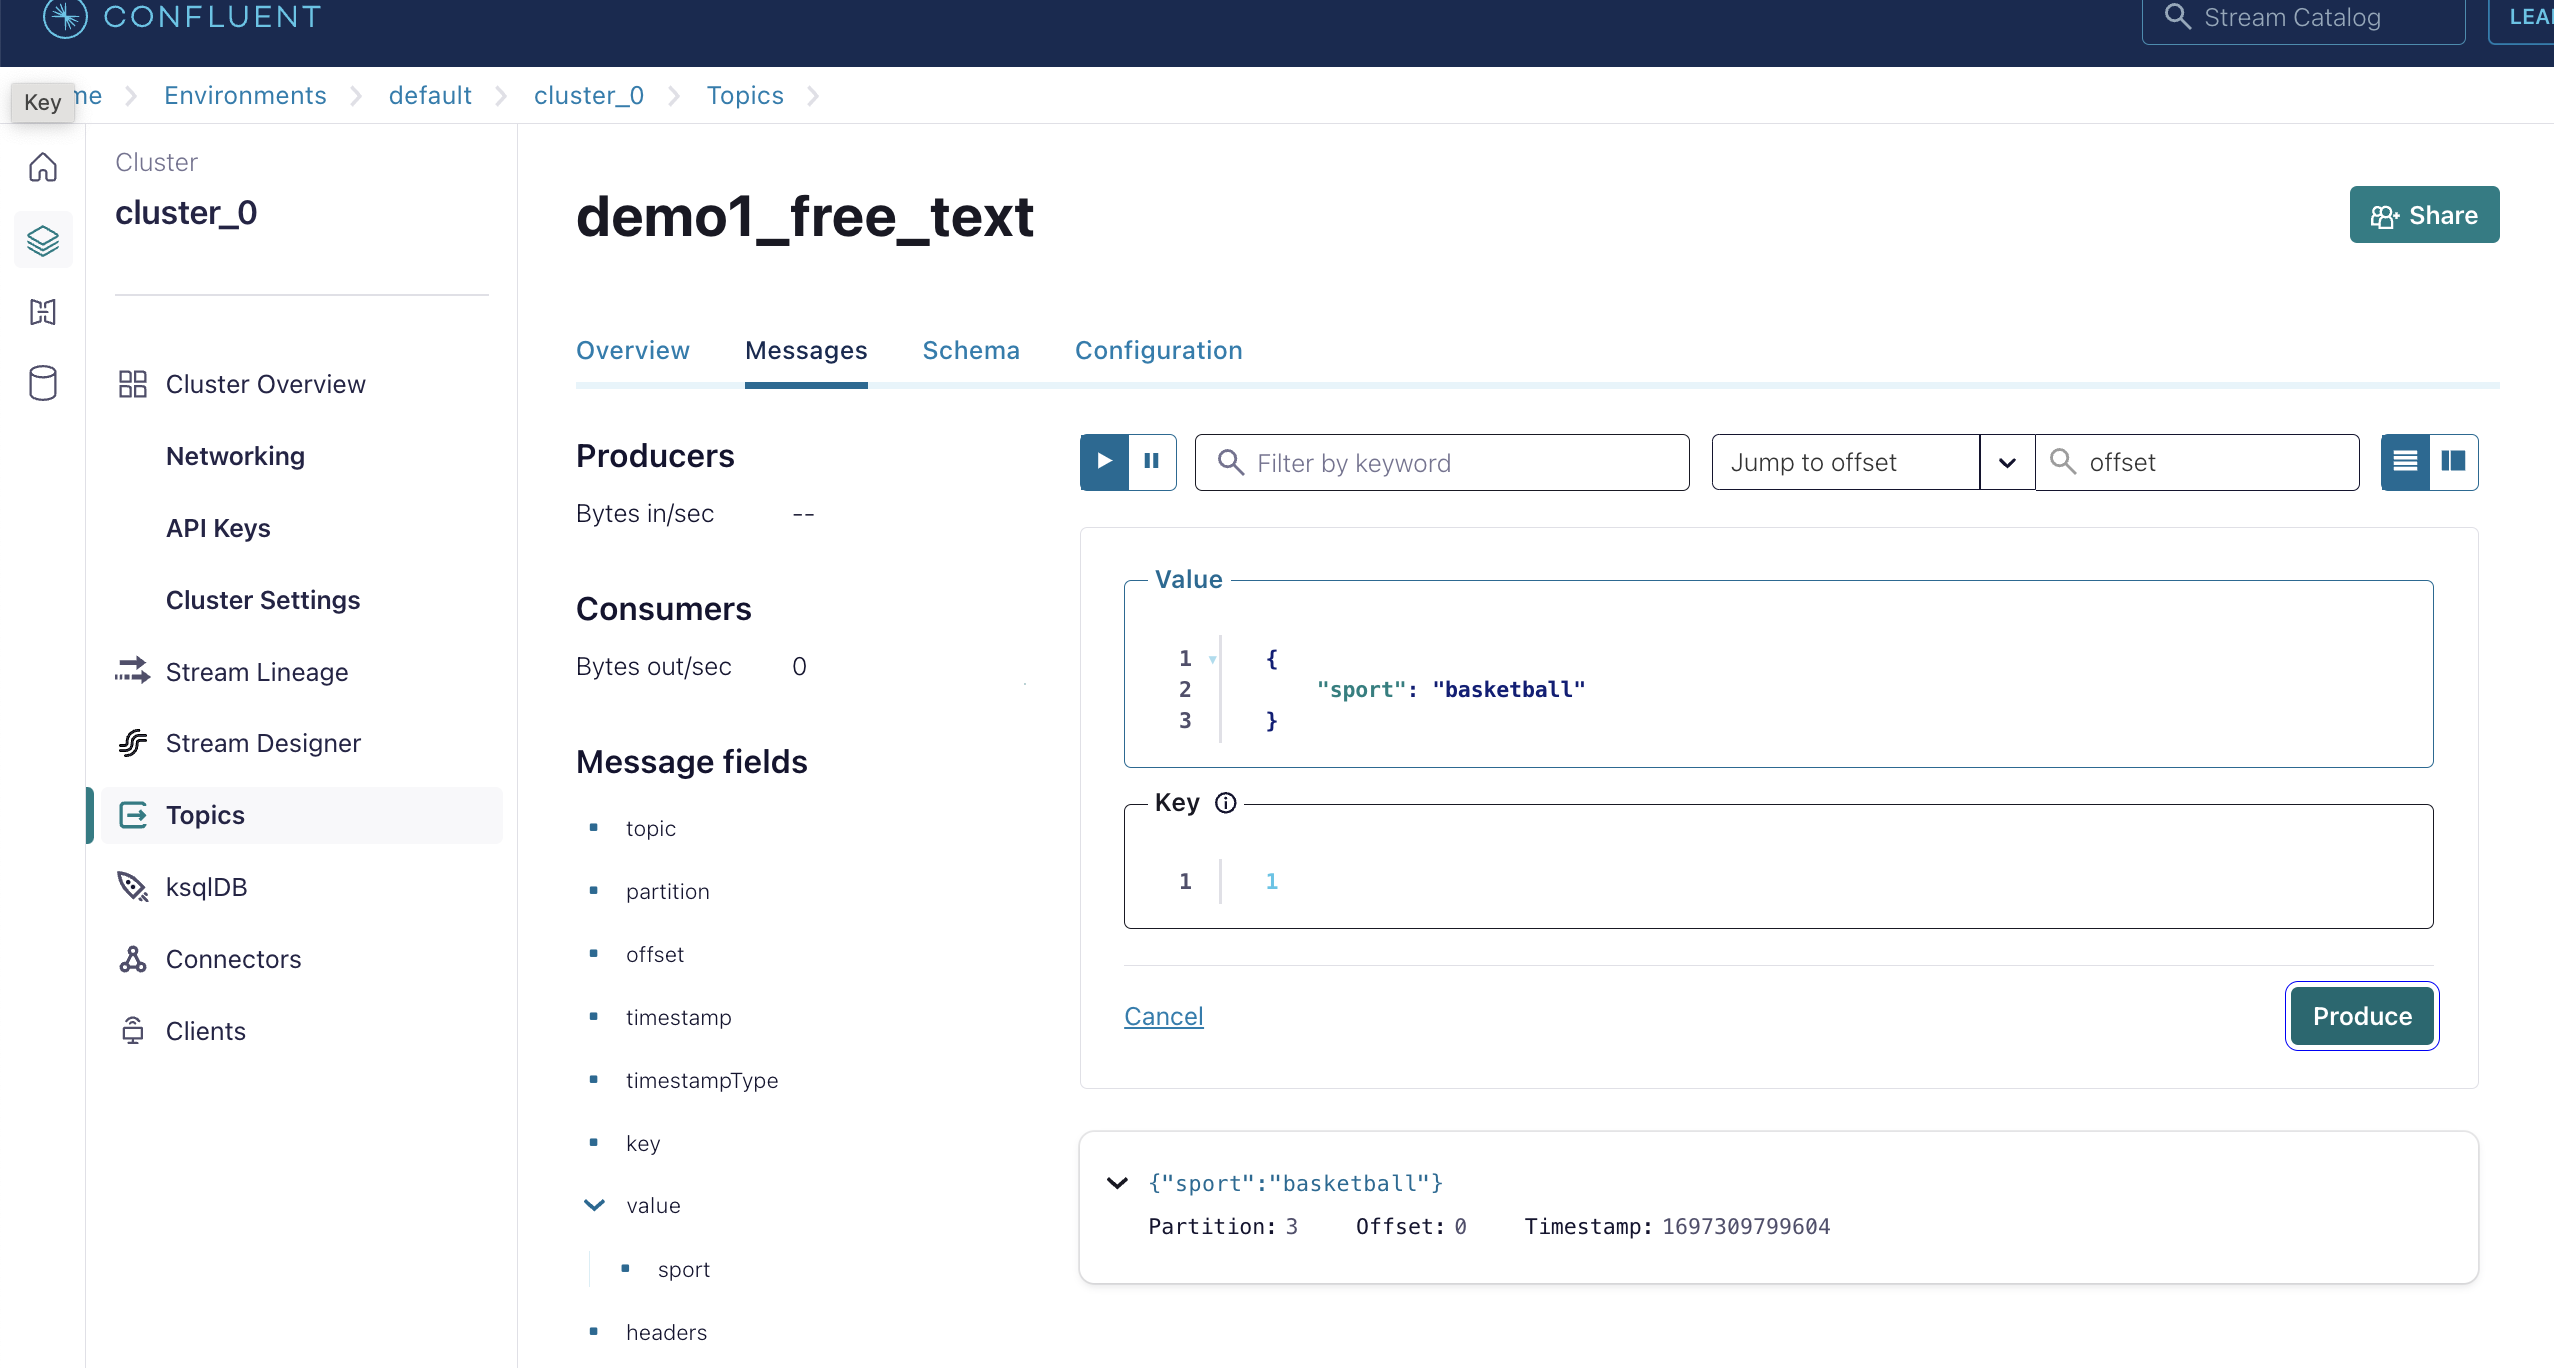
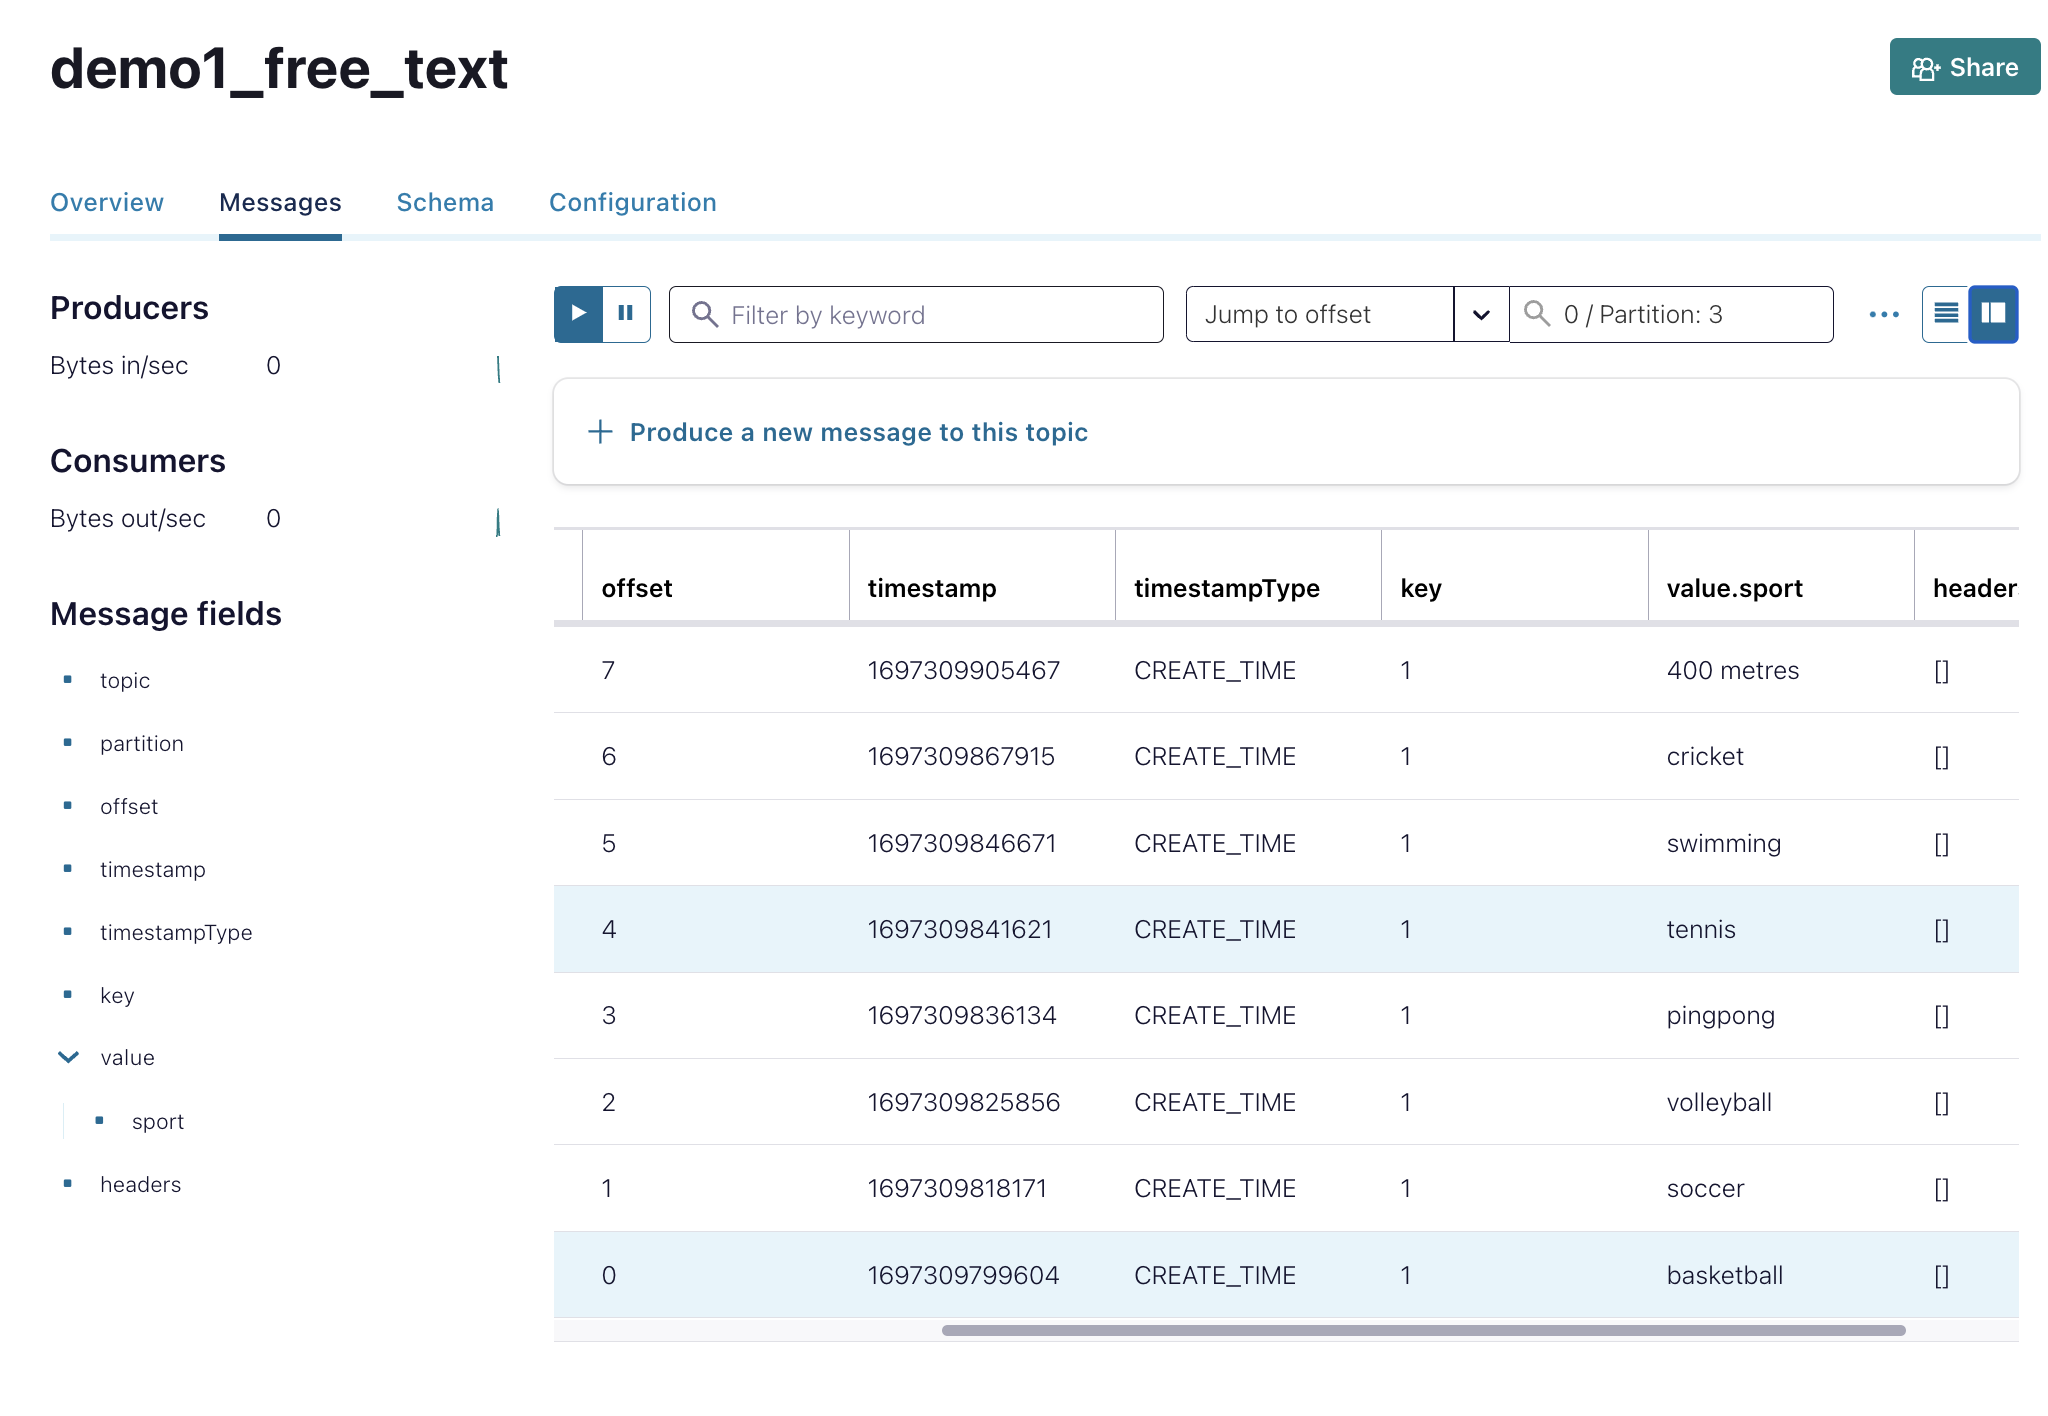
Create Topic Let's create topic called "demo1_free_text". Produce 8 messages with same key = 1 and different sport values.
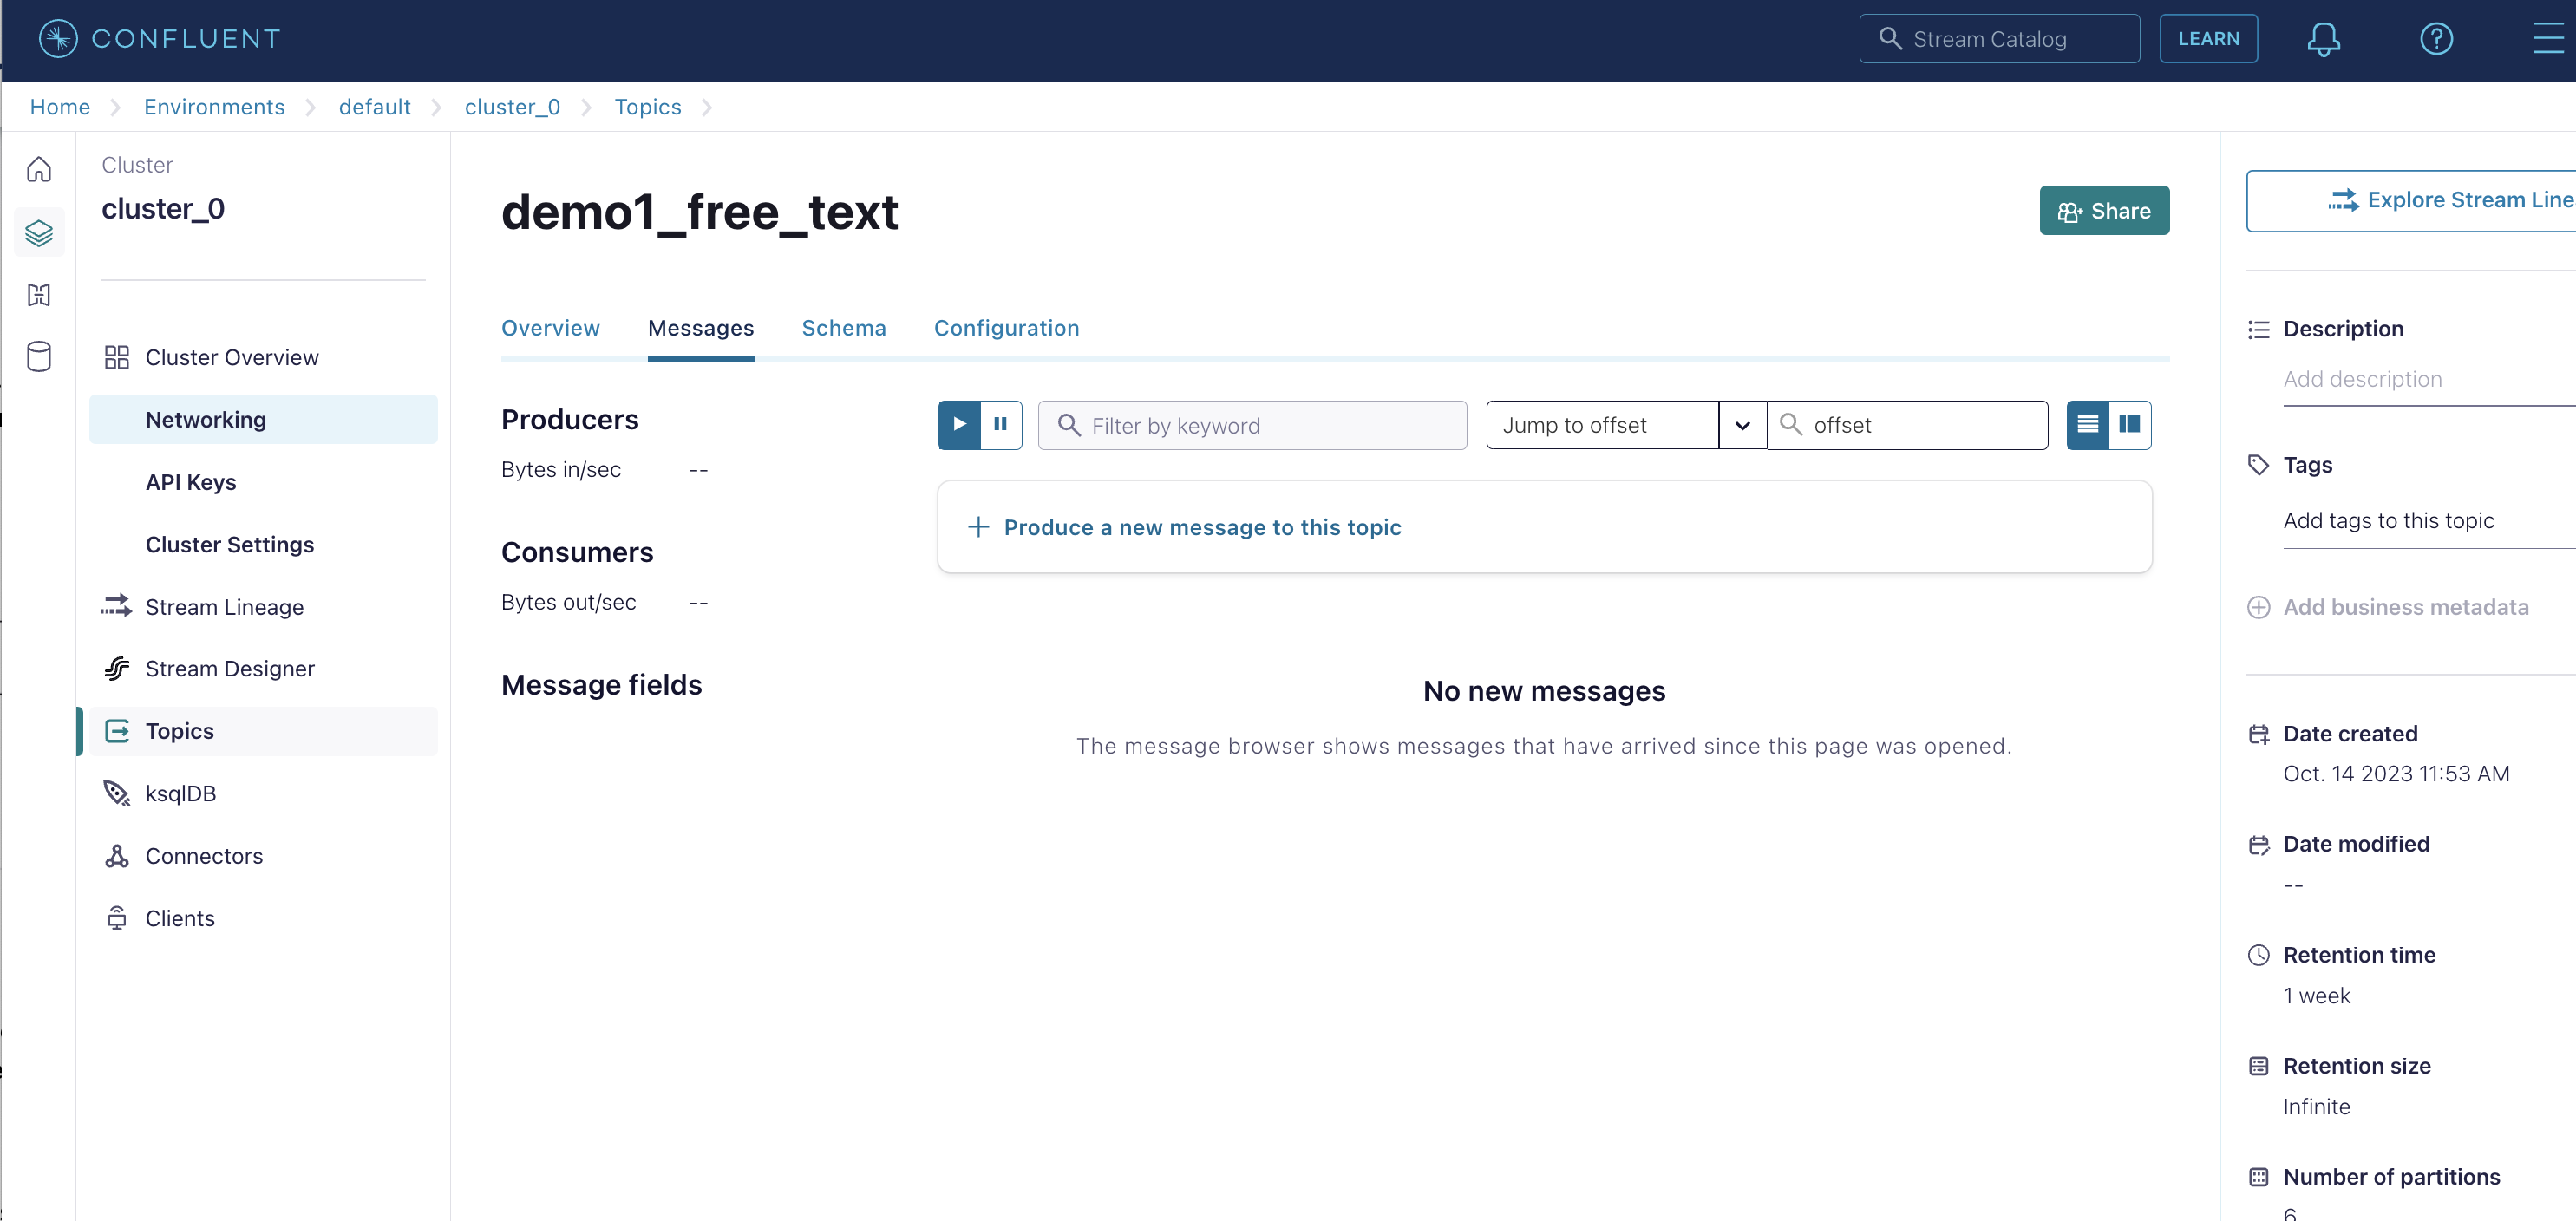
Do NOT shutdown the cluster. Let's go to the next section to set up CLI. We will come back to this Confluent UI later in the end of the instructions.
Step 3. Python 3: Make sure it's version 3.10.12 for consistency. If you already have python 3.10.x set up, then you can skip Step 3.
3.1 Environment
- Use a Macbook with Ventura 13.5.x. Avoid upgrading to MacOS 14.0 Sonoma.
- Ensure
pip(Python's package manager) is up-to-date. -
Install
brewif you haven't. It's a handy tool for Mac users. Please runbrew install brewto update it to latest version. -
Consider using a Python virtual environment. It helps keep things tidy!
- Before the demo, check your setups. For instance, verify the Python version with
python --version. - If you face setup issues, don't worry! We'll ensure everyone can follow along.
3.2 Installing ASDF
To manage python packages, ASDF can be installed on macOS using Homebrew:
After installation, ensure ASDF is added to your shell.
For zsh:
For bash:
3.3 Using ASDF
Here are some commonly used ASDF commands:
List all available plugins:
bash
List installed plugins:
bash
Add plugins:
bash
Install specific versions:
bash
3.4 Error
ModuleNotFoundError: No module named '_lzma'
WARNING: The Python lzma extension was not compiled. Missing the lzma lib?
brew install xz Great, you have successfully installed Python 3.10.12 with asdf. Here's what you might want to do next:
3.5 Set the Python version
Now that you have Python 3.10.12 installed, you might want to set it as your default version. You can do this with asdf's global command:
This will make Python 3.10.12 your default Python version in all directories.Alternatively, if you want to use this Python version only in your current directory (for a specific project), you can use asdf's local command:
Step 4. Installing Confluent CLI
Install the Confluent CLI and follow this official guide.
You can update it to latest CLI version by running brew upgrade confluentinc/tap/cli (assuming you installed CLI via brew).
My version of Confluent CLI: 3.38.0.
Step 5. Setting up Confluent CLI
Again, I recommend using official guide for most up-to-date information. In our demo today, here are the key steps below.
Environment: In Confluent Cloud, an environment is a logical workspace where you can organize your resources. You can think of it like a project folder in many other systems. One user can have multiple environments.
Cluster: Within an environment, you can have one or more Kafka clusters. A cluster is essentially a running instance of Kafka, where you can produce and consume messages.
-
Logging in to Confluent Cloud:
This logs you into Confluent Cloud via the CLI and saves your credentials locally, so you don't need to enter them repeatedly.
If you're using SSO (google login for example), then run this code below.
-
Listing Environments:
This lists all the environments you have access to. For a new account, this will typically be just one environment. Make note of the ID of the environment you want to use. -
Setting the Active Environment:
With this command, you're telling the CLI: "Hey, I want to work within this specific environment." -
Listing Clusters:
This lists all the Kafka clusters within the currently active environment. Make note of the cluster ID you want to interact with. -
Setting the Active Cluster:
This command sets the Kafka cluster you want to work with. All subsequent commands will interact with this cluster unless you change it. -
Creating an API Key:
An API key and secret are needed to authenticate and interact with your Kafka cluster programmatically. The--resource {ID}is the cluster ID you've previously noted. This command will provide you an API key and secret. Keep them safe; you'll need them to authenticate your requests. -
Using the API Key:
This tells the CLI to use the provided API key for authentication when interacting with the specified resource (Kafka cluster).
Step 6. Managing topics with Confluent CLI
In this step, we'll learn how to manage Kafka topics using the Confluent CLI. We'll produce some messages to a topic and consume them to see how Kafka handles message streams.
6.1 Listing Existing Topics: Before diving into producing and consuming messages, let's see which topics are already available in your Kafka cluster:
6.2 Producing and Consuming Messages: To truly understand Kafka, it's beneficial to visualize the interaction between a producer (which sends messages) and a consumer (which reads messages). For this, we'll open two terminal windows: one for the producer and one for the consumer.
-
Terminal 1: Producer's Perspective:
To send messages to a topic, use the following command:
Now, input the following messages:
-
Terminal 2: Consumer's Perspective:
To read messages from a topic, use the following command:
Observe the messages appearing in real-time as they’re produced in Terminal 1.
6.3 Verifying in Confluent Cloud UI:
After producing and consuming messages using the CLI, it's a good practice to check the Confluent Cloud UI to see the data visually:
- Go to Confluent Cloud.
- Navigate to the topic overview page for the topic you chose.
- Click on the Messages tab.
- In the Jump to offset field, enter "0".
- Select different partitions to observe where the new messages have been stored.
Summary
There are many concepts so far. I hope to give a clear picture of the relationship between the different components of Confluent Cloud and how they are accessed via the CLI. Let's break down the hierarchy and relationship of the Confluent Cloud UI and how it interacts with the CLI.
Confluent Cloud Hierarchy:
-
Environment:
- An environment is the highest level of organization in Confluent Cloud. It's a logical grouping mechanism.
- You might have different environments for different purposes, such as Development, Testing, and Production.
- Each environment has a unique Environment ID.
-
Cluster:
- Within an environment, you can have one or more Kafka clusters.
- Each cluster has its resources, such as brokers, topics, etc.
- Each cluster has a unique Cluster ID within the environment.
Accessing via CLI:
To access and manage resources within Confluent Cloud using the CLI, you often need to specify both the environment and cluster you want to interact with. This is especially true if you have multiple environments or clusters, as many organizations do.
Typically, the process involves:
-
Authentication:
- You'll first authenticate your CLI with Confluent Cloud using your API key and secret.
-
Setting the Environment:
- Use the Environment ID to specify which environment you want to work within.
-
Accessing/Managing a Cluster:
- Once inside an environment, use the Cluster ID to specify which cluster you want to interact with.
Example:
Imagine you have two environments: Development and Production. In the Development environment, you have a Kafka cluster named DevCluster.
To manage a resource in DevCluster using the CLI:
- Authenticate your CLI with Confluent Cloud.
- Set your working environment to
Developmentusing its Environment ID. - Access or manage
DevClusterusing its Cluster ID.
Conceptual Visualization:
Confluent Cloud
|
|-- Environment 1 (Development)
|   |
|   |-- Cluster A (DevCluster)
|   |   |
|   |   |-- Topic 1
|   |   |-- Topic 2
|   |
|   |-- Cluster B
|
|-- Environment 2 (Production)
    |
    |-- Cluster C
    |
    |-- Cluster D
When working with the Confluent CLI, you'd authenticate, select Environment 1 (using its ID), then select Cluster A (using its ID) to interact with topics or other resources within that cluster.
Created: 2023-09-18